|
|
| (未显示同一用户的24个中间版本) |
| 第1行: |
第1行: |
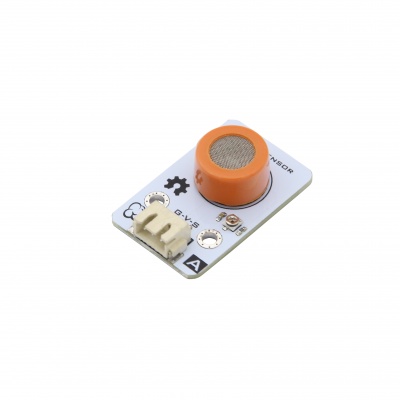
| − | <@@@IMG150526@@@> | + | [[文件:RLSEB011M3-01.jpg|400px|right|middle|thumb|气体传感器]] |
| | + | <br> |
| | + | <br> |
| | + | <br> |
| | + | <br> |
| | + | <br> |
| | + | <br> |
| | + | <br> |
| | + | <br> |
| | + | <br> |
| | + | <br> |
| | + | <br> |
| | + | <br> |
| | + | =产品简介= |
| | + | 气体传感器,当探头检测到特点气体后,输入值会大幅变化。兼容Arduino,Mixly,Scratch,物联网等多种编程方式。Note:传感器连接控制器后先静置一段时间,待传感器值平稳后测试更准确。 |
| | + | {| border="0" cellpadding="0" width="80%" |
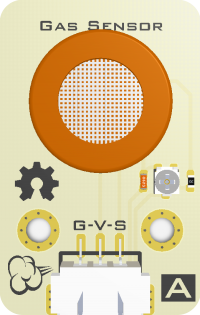
| | + | | width="25%" valign="bottom" align="center"|[[File:RLSEB011M3-TOP.png|200px]] <br> <big>旧版</big> |
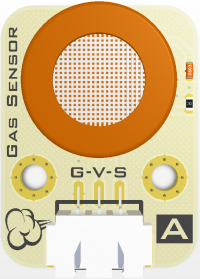
| | + | | width="25%" valign="bottom" align="center"|[[File:RLSEB011M3-TOP2.png|200px]] <br> <big>新版</big> |
| | + | | width="25%" valign="bottom" align="center"| |
| | + | | width="25%" valign="bottom" align="center"| |
| | + | |} |
| | + | 新版,修改了模块尺寸,去掉了电位计,功能和旧版无变化。 |
| | + | =规格参数= |
| | + | *产品编码:[RLSEB011M3] |
| | + | *机械尺寸:26×41(mm) |
| | + | *安装孔距:16(mm) |
| | + | *安装孔径:φ3.3(mm) |
| | + | *电源要求:+3.0-5.5V |
| | + | *信号类型:模拟信号|输入 |
| | + | *电气接口:XH2.54-3P |
| | + | *引脚定义:G-地 V-电源 S-信号 |
| | + | *模块重量:5.6g |
| | | | |
| | + | =连线图= |
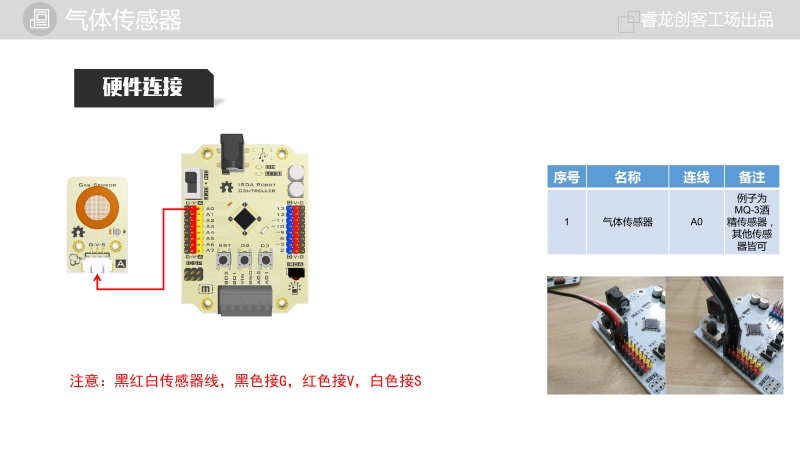
| | + | [[文件:酒精传感器01.jpg|thumb|800px|center|连线图]] |
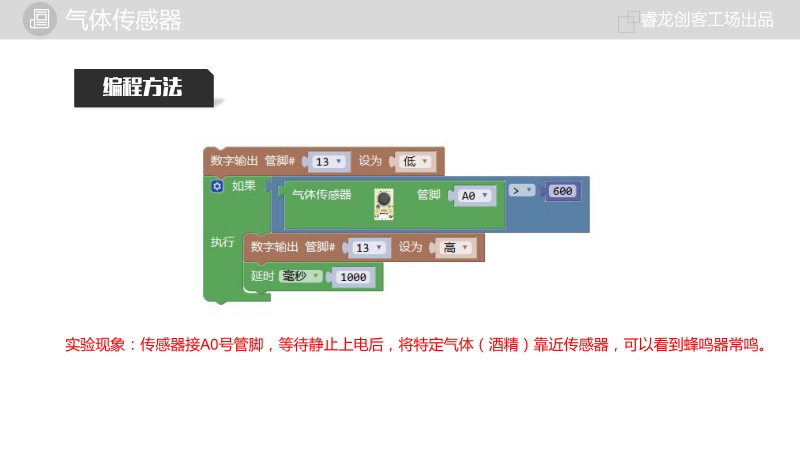
| | + | =程序图= |
| | + | [[文件:酒精传感器02.jpg|800px|center|middle|thumb|程序图]] |
| | | | |
| − | <a class="image"><img alt="" src="/images/thumb/5/58/RLSEB011M3-01.jpg/400px-RLSEB011M3-01.jpg" width="400" height="400" class="thumbimage" srcset="/images/thumb/5/58/RLSEB011M3-01.jpg/600px-RLSEB011M3-01.jpg 1.5x, /images/thumb/5/58/RLSEB011M3-01.jpg/800px-RLSEB011M3-01.jpg 2x"></a> <a class="internal" title="放大"></a>气体传感器" data-mw-type="image" data-mw-id="150526" data-mw-src="文件:RLSEB011M3-01.jpg" data-mw-link="false" data-mw-title="气体传感器" data-mw-caption="气体传感器" data-mw-sizewidth="400" data-mw-sizeheight="false" data-mw-horizontalalign="right" data-mw-format="thumb" data-mw-wikitext="%5B%5B%E6%96%87%E4%BB%B6:RLSEB011M3-01.jpg%7Cthumb%7C400px%7Cright%7C%E6%B0%94%E4%BD%93%E4%BC%A0%E6%84%9F%E5%99%A8%5D%5D" draggable="true" contenteditable="false">
| + | =配送清单= |
| | + | * [https://item.taobao.com/item.htm?spm=a1z10.3-c.w4002-8248268850.9.6aa76cf0HN5lZ4&id=584189879975 1PCS x 酒精传感器] |
| | + | * [https://item.taobao.com/item.htm?spm=a1z10.3-c.w4002-8248268850.45.253f6cf0FLQhxl&id=531446612555 1PCS x 传感器线-XH2.54 3PIN 20CM] |
| | | | |
| − | <h2>产品简介</h2> 气体传感器,当探头检测到特点气体后,输入值会大幅变化。兼容Arduino,Mixly,Scratch,物联网等多种编程方式。Note:传感器连接控制器后先静置一段时间,待传感器值平稳后测试更准确。<brclass="mw_emptyline_first"><brclass="mw_emptyline"><brclass="mw_emptyline"><brclass="mw_emptyline"><brclass="mw_emptyline"><brclass="mw_emptyline"><brclass="mw_emptyline"><brclass="mw_emptyline">
| + | =资源下载= |
| − | | + | *[https://wiki.ruilongmaker.cc/images/f/f0/RLSEB011MQ_SCH.pdf 气体传感器(酒精)原理图] |
| − | | + | *[https://wiki.ruilongmaker.cc/images/4/44/RLSEB011MQ_3D.zip 气体传感器(酒精)3D模型] |
| − | <h2>规格参数</h2><ul><li>机械尺寸:26×41(mm)</li><li>安装孔距:16(mm)</li><li>安装孔径:φ3.3(mm)</li><li>电源要求:+3.0-5.5V</li><li>信号类型:模拟信号|输入</li><li>电气接口:XH2.54-3P</li><li>引脚定义:G-地 V-电源 S-信号</li></ul><brclass="mw_emptyline_first"><brclass="mw_emptyline">
| + | *[https://wiki.ruilongmaker.cc/images/2/29/RLSEB011MQ_2D.pdf 气体传感器(酒精)尺寸图] |
| − | | + | *[https://wiki.ruilongmaker.cc/images/1/17/MQ%E7%B3%BB%E5%88%97%E4%BC%A0%E6%84%9F%E5%99%A8%E8%A7%84%E6%A0%BC.pdf MQ系列传感器规格] |
| − | | |
| − | <hr><h2>连线图</h2><@@@IMG199082@@@>
| |
| − | | |
| − | | |
| − | <a class="image"><img alt="" src="/images/thumb/6/64/%E9%85%92%E7%B2%BE%E4%BC%A0%E6%84%9F%E5%99%A801.jpg/800px-%E9%85%92%E7%B2%BE%E4%BC%A0%E6%84%9F%E5%99%A801.jpg" width="800" height="450" class="thumbimage" srcset="/images/thumb/6/64/%E9%85%92%E7%B2%BE%E4%BC%A0%E6%84%9F%E5%99%A801.jpg/1200px-%E9%85%92%E7%B2%BE%E4%BC%A0%E6%84%9F%E5%99%A801.jpg 1.5x, /images/thumb/6/64/%E9%85%92%E7%B2%BE%E4%BC%A0%E6%84%9F%E5%99%A801.jpg/1600px-%E9%85%92%E7%B2%BE%E4%BC%A0%E6%84%9F%E5%99%A801.jpg 2x"></a> <a class="internal" title="放大"></a>连线图" data-mw-type="image" data-mw-id="199082" data-mw-src="文件:酒精传感器01.jpg" data-mw-link="false" data-mw-title="连线图" data-mw-caption="连线图" data-mw-sizewidth="800" data-mw-sizeheight="false" data-mw-horizontalalign="center" data-mw-format="thumb" data-mw-wikitext="%5B%5B%E6%96%87%E4%BB%B6:%E9%85%92%E7%B2%BE%E4%BC%A0%E6%84%9F%E5%99%A801.jpg%7Cthumb%7C800px%7Ccenter%7C%E8%BF%9E%E7%BA%BF%E5%9B%BE%5D%5D" draggable="true" contenteditable="false"><p></p><h2>程序图(MIXLY)</h2><@@@IMG175913@@@>
| |
| − | | |
| − | | |
| − | <a class="image"><img alt="" src="/images/thumb/3/34/%E9%85%92%E7%B2%BE%E4%BC%A0%E6%84%9F%E5%99%A802.jpg/800px-%E9%85%92%E7%B2%BE%E4%BC%A0%E6%84%9F%E5%99%A802.jpg" width="800" height="450" class="thumbimage" srcset="/images/thumb/3/34/%E9%85%92%E7%B2%BE%E4%BC%A0%E6%84%9F%E5%99%A802.jpg/1200px-%E9%85%92%E7%B2%BE%E4%BC%A0%E6%84%9F%E5%99%A802.jpg 1.5x, /images/thumb/3/34/%E9%85%92%E7%B2%BE%E4%BC%A0%E6%84%9F%E5%99%A802.jpg/1600px-%E9%85%92%E7%B2%BE%E4%BC%A0%E6%84%9F%E5%99%A802.jpg 2x"></a> <a class="internal" title="放大"></a>程序图" data-mw-type="image" data-mw-id="175913" data-mw-src="文件:酒精传感器02.jpg" data-mw-link="false" data-mw-title="程序图" data-mw-caption="程序图" data-mw-sizewidth="800" data-mw-sizeheight="false" data-mw-horizontalalign="center" data-mw-format="thumb" data-mw-wikitext="%5B%5B%E6%96%87%E4%BB%B6:%E9%85%92%E7%B2%BE%E4%BC%A0%E6%84%9F%E5%99%A802.jpg%7Cthumb%7C800px%7Ccenter%7C%E7%A8%8B%E5%BA%8F%E5%9B%BE%5D%5D" draggable="true" contenteditable="false"><p></p><h2>配送清单</h2><brclass="mw_emptyline"><@@@TAG137629@@@>
| |
| − | | |
| − | | |
| − | | |
| − | <pre>/* Blink Turns an LED on for one second, then off for one second, repeatedly. Most Arduinos have an on-board LED you can control. On the UNO, MEGA and ZERO it is attached to digital pin 13, on MKR1000 on pin 6. LED_BUILTIN is set to the correct LED pin independent of which board is used. If you want to know what pin the on-board LED is connected to on your Arduino model, check the Technical Specs of your board at: https://www.arduino.cc/en/Main/Products modified 8 May 2014 by Scott Fitzgerald modified 2 Sep 2016 by Arturo Guadalupi modified 8 Sep 2016 by Colby Newman This example code is in the public domain. http://www.arduino.cc/en/Tutorial/Blink*/// the setup function runs once when you press reset or power the boardvoid setup() { // initialize digital pin LED_BUILTIN as an output. pinMode(LED_BUILTIN, OUTPUT);}// the loop function runs over and over again forevervoid loop() { digitalWrite(LED_BUILTIN, HIGH); // turn the LED on (HIGH is the voltage level) delay(1000); // wait for a second digitalWrite(LED_BUILTIN, LOW); // turn the LED off by making the voltage LOW delay(1000); // wait for a second}</pre>" data-mw-type="tag" data-mw-id="137629" data-mw-name="syntaxhighlight" data-mw-wikitext="%3Csyntaxhighlight%20lang=%22C%22%20style=%22border:3px%20dashed%20blue%22%3E%0A%0A%0A%0A/*%0A%20%20Blink%0A%0A%20%20Turns%20an%20LED%20on%20for%20one%20second,%20then%20off%20for%20one%20second,%20repeatedly.%0A%0A%20%20Most%20Arduinos%20have%20an%20on-board%20LED%20you%20can%20control.%20On%20the%20UNO,%20MEGA%20and%20ZERO%0A%20%20it%20is%20attached%20to%20digital%20pin%2013,%20on%20MKR1000%20on%20pin%206.%20LED_BUILTIN%20is%20set%20to%0A%20%20the%20correct%20LED%20pin%20independent%20of%20which%20board%20is%20used.%0A%20%20If%20you%20want%20to%20know%20what%20pin%20the%20on-board%20LED%20is%20connected%20to%20on%20your%20Arduino%0A%20%20model,%20check%20the%20Technical%20Specs%20of%20your%20board%20at:%0A%20%20https://www.arduino.cc/en/Main/Products%0A%0A%20%20modified%208%20May%202014%0A%20%20by%20Scott%20Fitzgerald%0A%20%20modified%202%20Sep%202016%0A%20%20by%20Arturo%20Guadalupi%0A%20%20modified%208%20Sep%202016%0A%20%20by%20Colby%20Newman%0A%0A%20%20This%20example%20code%20is%20in%20the%20public%20domain.%0A%0A%20%20http://www.arduino.cc/en/Tutorial/Blink%0A*/%0A%0A//%20the%20setup%20function%20runs%20once%20when%20you%20press%20reset%20or%20power%20the%20board%0Avoid%20setup()%20%7B%0A%20%20//%20initialize%20digital%20pin%20LED_BUILTIN%20as%20an%20output.%0A%20%20pinMode(LED_BUILTIN,%20OUTPUT);%0A%7D%0A%0A//%20the%20loop%20function%20runs%20over%20and%20over%20again%20forever%0Avoid%20loop()%20%7B%0A%20%20digitalWrite(LED_BUILTIN,%20HIGH);%20%20%20//%20turn%20the%20LED%20on%20(HIGH%20is%20the%20voltage%20level)%0A%20%20delay(1000);%20%20%20%20%20%20%20%20%20%20%20%20%20%20%20%20%20%20%20%20%20%20%20//%20wait%20for%20a%20second%0A%20%20digitalWrite(LED_BUILTIN,%20LOW);%20%20%20%20//%20turn%20the%20LED%20off%20by%20making%20the%20voltage%20LOW%0A%20%20delay(1000);%20%20%20%20%20%20%20%20%20%20%20%20%20%20%20%20%20%20%20%20%20%20%20//%20wait%20for%20a%20second%0A%7D%0A%0A%3C/syntaxhighlight%3E" contenteditable="false"> Blink
| |
| − | | |
| − | Turns an LED on for one second, then off for one second, repeatedly.
| |
| − | | |
| − | Most Arduinos have an on-board LED you can control. On the UNO, MEGA and ZERO
| |
| − | it is attached to digital pin 13, on MKR1000 on pin 6. LED_BUILTIN is set to
| |
| − | the correct LED pin independent of which board is used.
| |
| − | If you want to know what pin the on-board LED is connected to on your Arduino
| |
| − | model, check the Technical Specs of your board at:
| |
| − | https://www.arduino.cc/en/Main/Products
| |
| − | | |
| − | modified 8 May 2014
| |
| − | by Scott Fitzgerald
| |
| − | modified 2 Sep 2016
| |
| − | by Arturo Guadalupi
| |
| − | modified 8 Sep 2016
| |
| − | by Colby Newman
| |
| − | | |
| − | This example code is in the public domain.
| |
| − | | |
| − | http://www.arduino.cc/en/Tutorial/Blink<ul><li>/</li></ul>
| |
| − | | |
| − | // the setup function runs once when you press reset or power the board
| |
| − | void setup() {
| |
| − | // initialize digital pin LED_BUILTIN as an output.
| |
| − | pinMode(LED_BUILTIN, OUTPUT);
| |
| − | }
| |
| − | | |
| − | // the loop function runs over and over again forever
| |
| − | void loop() {
| |
| − | digitalWrite(LED_BUILTIN, HIGH); // turn the LED on (HIGH is the voltage level)
| |
| − | delay(1000); // wait for a second
| |
| − | digitalWrite(LED_BUILTIN, LOW); // turn the LED off by making the voltage LOW
| |
| − | delay(1000); // wait for a second
| |
| − | }
| |
